1
Open Command Prompt as Administrator
Right-click the Start button and select Windows Terminal (Admin) or Command Prompt (Admin) to open an elevated session.
Changing your IP address is a network configuration operation that replaces your device's current network identifier by requesting a new DHCP lease (RFC 2131) from your router, assigning a static address manually, or prompting your ISP to reassign your public address. Public IPs are controlled by your ISP and shared across your entire home network via your router; private IPs are assigned by your router to each individual device on your LAN. Both can be changed independently using different methods. If your goal is to mask your IP for privacy, see the guide on how to hide your IP address instead.
You have two IP addresses: a public one that your ISP gives your router, and a private one that your router gives each device. The method you need depends on which one you want to change.
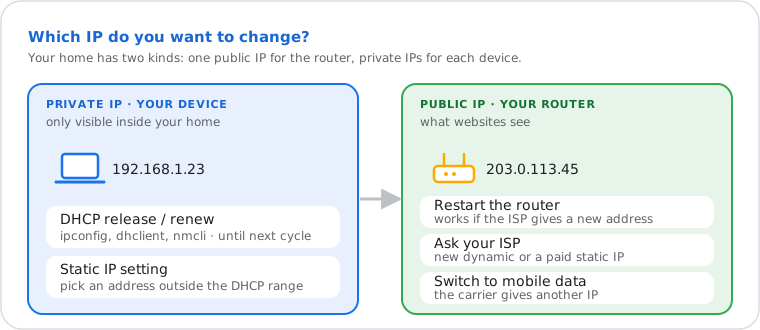
Every internet-connected home network uses two distinct layers of IP addressing, and the method you need depends entirely on which layer you want to change.
Your public IP address is the address your ISP assigns to your router. It is the address external servers see when you browse the web, and every device on your home network shares it. Your ISP controls this address — it is issued via DHCP (RFC 2131) from your ISP's address pool and may change if the DHCP lease expires or you disconnect for an extended period.
Your private IP address is the address your router assigns to your specific device on the local network — your laptop, phone, or desktop. These addresses fall within the ranges defined by RFC 1918 (10.x.x.x, 172.16–31.x.x, 192.168.x.x) and are not routable on the public internet. Your router issues them via its own DHCP server. See the public IP vs. private IP guide for a full breakdown of the RFC 1918 ranges and NAT mechanics.
Changing your public IP and changing your private IP require completely different approaches. Methods 1 and 4 below address your public IP. Methods 2 and 3 address your private IP. Most users troubleshooting local network issues need Method 2. Users troubleshooting ISP-level issues or needing a different external address need Method 1 or 4.
Restarting your router can give you a new public IP if your ISP uses dynamic addresses. Unplug it for 5–10 minutes, then check your IP again.
Most residential ISPs issue dynamic public IP addresses via DHCP. When your router disconnects and reconnects, the ISP's DHCP server may issue a different address from its pool — particularly if enough time has passed for the existing lease to be reclaimed.
To maximize the chance of receiving a new address:
This method does not always produce a new IP. ISPs frequently use sticky DHCP leases that reassign the same address to the same router MAC address. If the address persists after multiple attempts, contact your ISP directly (Method 4) or use the What Is My ISP tool to confirm which ISP controls your current public address.
Do it yourself
To change only your device’s local (private) IP, release and renew its DHCP lease. On Windows, run ipconfig /release and then ipconfig /renew.
DHCP release and renew is the standard method for refreshing your device's private (local) IP address without touching the router. Your device sends a DHCP Release message to your router, which frees the existing lease. It then broadcasts a DHCP Discover, and the router responds with a DHCP Offer and Acknowledge per the four-step handshake defined in RFC 2131 (Discover → Offer → Request → Acknowledge). The DHCP server communicates over UDP ports 67 (server) and 68 (client).
This changes your private IP only. Your public IP is unaffected. For DHCP lease mechanics and lease duration theory, see the static IP vs. dynamic IP guide.
ipconfig /release
ipconfig /renew
Run Command Prompt as Administrator. The /release command sends a DHCP Release. The /renew command initiates the full Discover → Offer → Request → Acknowledge cycle and prints the new assigned address.
# View current IP configuration
Get-NetIPConfiguration

# Release and renew via ipconfig (fastest method)
ipconfig /release; ipconfig /renew# Renew DHCP lease on Wi-Fi interface (en0)
sudo ipconfig set en0 DHCP
# If connected via Ethernet, replace en0 with en1 or the correct interface
# Run 'ifconfig' to list active interfacesAlternatively, open System Settings → Network → select your connection → click Details → TCP/IP tab → click Renew DHCP Lease.
# Release current lease
sudo dhclient -r eth0

# Request new lease
sudo dhclient eth0# Reconnect the active connection to trigger a fresh DHCP lease
nmcli con down "Wired connection 1" && nmcli con up "Wired connection 1"Online lookup tools like WhatIsMyIPNow query from an external server, so results always reflect your public IP — not the private address changed by this method. Use ipconfig or ifconfig locally to confirm the private IP change.
Do it yourself
Static IP assignment replaces your DHCP-assigned private IP with a fixed address you specify manually. This is required for local server hosting, port forwarding rules, printer sharing, and network device allow-listing — any scenario where a device's local IP must not change between reboots.
When assigning a static local IP, choose an address in your router's subnet (e.g., 192.168.1.x if your router is 192.168.1.1) and outside the router's DHCP assignment range to avoid conflicts.
Open Settings → Network & Internet → select your connection → click Edit next to IP assignment → choose Manual → toggle IPv4 on → enter your desired IP address, subnet prefix length (typically 24), and default gateway (your router's IP) → click Save.
Via PowerShell (run as Administrator):
# Assign a static IP to the Wi-Fi adapter
New-NetIPAddress -InterfaceAlias "Wi-Fi" -IPAddress 192.168.1.100 -PrefixLength 24 -DefaultGateway 192.168.1.1

# To return to DHCP
Set-NetIPInterface -InterfaceAlias "Wi-Fi" -Dhcp Enabled
Remove-NetIPAddress -InterfaceAlias "Wi-Fi" -Confirm:$falseOpen System Settings → Network → select your connection → click Details → TCP/IP tab → change Configure IPv4 to Manually → enter your IP address, subnet mask (255.255.255.0), and router address → click OK.
# Via Terminal
sudo networksetup -setmanual Wi-Fi 192.168.1.100 255.255.255.0 192.168.1.1

# Return to DHCP
sudo networksetup -setdhcp Wi-Fi# Using nmcli
nmcli con mod "Wired connection 1" ipv4.addresses 192.168.1.100/24
nmcli con mod "Wired connection 1" ipv4.gateway 192.168.1.1
nmcli con mod "Wired connection 1" ipv4.method manual
nmcli con up "Wired connection 1"
# Return to DHCP
nmcli con mod "Wired connection 1" ipv4.method auto
nmcli con up "Wired connection 1"Open Settings → Connections → Wi-Fi → long-press your network → tap Manage Network Settings → expand Advanced → change IP Settings to Static → enter your desired IP address and gateway → tap Save.
Open Settings → Wi-Fi → tap the information icon next to your network → tap Configure IP → select Manual → enter your IP address, subnet mask, and router address → tap Save.
If a restart doesn’t work, ask your ISP for a new IP. For a quick, temporary change, switch from Wi-Fi to mobile data.
If a router restart does not produce a new public IP, contact your ISP directly. Most ISPs will reassign a dynamic public IP on request. A permanent static public IP — required for hosting a publicly accessible server — typically requires a paid plan upgrade and a formal request to your ISP's business or technical team.
For a quick, temporary change to your public-facing address without VPN software, disconnect from your home Wi-Fi network and switch to your mobile carrier's data network. Your device is assigned a public IP from your carrier's address pool — entirely separate from your ISP's home network assignment. This is useful for testing whether a service blocks your home IP, or verifying that geolocation differs between your home and carrier addresses. Use the IP Lookup tool to confirm the address change and the What Is My ISP tool to verify the new carrier assignment.
For sustained IP masking using VPN tunneling or proxy routing, see the hide your IP address guide and what is a VPN — those methods are out of scope for this procedural guide.
| Method | What It Changes | Duration | Platforms | Prerequisites |
|---|---|---|---|---|
| Router power cycle | Public IP address | Until next ISP DHCP renewal | All devices on the LAN | Physical or admin access to router |
| DHCP release and renew (ipconfig, dhclient, nmcli) | Private IP (local network only) | Until next DHCP cycle | Windows, macOS, Linux | Administrator or sudo privileges |
| Static IP assignment | Private IP (local network only) | Permanent until changed manually | Windows, macOS, Linux, Android, iOS | Admin access; valid subnet address outside DHCP range |
| ISP request | Public IP address | New dynamic assignment or permanent static | All (via ISP account) | ISP account credentials; static IP may require a paid plan |
| Switch to mobile data | Public IP address (carrier-assigned) | Duration of mobile data session | Smartphones and tablets | Active mobile data plan |
Use Command Prompt to send a DHCP Release and Renew cycle, requesting a fresh private IP from your router — no router restart required.